a

How to Debug Ruby on Rails through SSL with RubyMine Foreman

Joel Garcia Joel Garcia has been building AllCode since 2015. He’s an innovative, hands-on executive with a proven record of designing, developing, and operating Software-as-a-Service (SaaS), mobile, and desktop solutions. Joel has expertise in HealthTech, VoIP, and cloud-based solutions. Joel has experience scaling multiple start-ups for successful exits to IMS Health and Golden Gate Capital, […]

If you’re required to debug Ruby on Rails in RubyMine Foreman through SSL, e.g. you’ve got a Facebook App, you will find the following useful.
Unfortunately, I’ve not been able to find a way to debug by using the standard debug rails configuration.  Instead, I had to take the following steps
1. Install Foreman. Foreman is a nice little gem that enables you to launch multiple processes through the use of a Procfile. You can find more info here, http://blog.daviddollar.org/2011/05/06/introducing-foreman.html. The easiest way to add Foreman is to add the Foreman gem to your Gemfile, and run bundle install.
gem ‘foreman’
2. After you install Foreman, you’ll need to figure out your Foreman path. I’m using RVM. My Foreman is installed here:
/Users/joelgarcia/.rvm/gems/ruby-1.9.3-p484/gems/foreman-0.63.0/bin/foreman
3. In RubyMine, go to RunEdit Configurations. The Run/Debug Configurations Dialogwill come up. Typically, when you debug in RubyMine, you’re debugging in Rails. We’re going to do something a little different, we’re going to debug using a Ruby Script. Click on the + button in the upper left-hand corner. Select Ruby. A new configuration dialog will be displayed. Take the following steps:

  • On the Config Tab, Name: Debug SSL
  • On the Config Tab, Ruby Script: Path to Foreman in my case: /Users/joelgarcia/.rvm/gems/ruby-1.9.3-p484/gems/foreman-0.63.0/bin/foreman
  • On the Config Tab, Script Argument: Start
  • On the Config Tab, Working Directory: Your Project’s root directory.
  • On the Bundler Tab, check the “Run the script in context of the bundle
  • On the Logs, add a new entry where the Log File Entry is equal to development log.

It should look something like this
RubyMine Debug Config
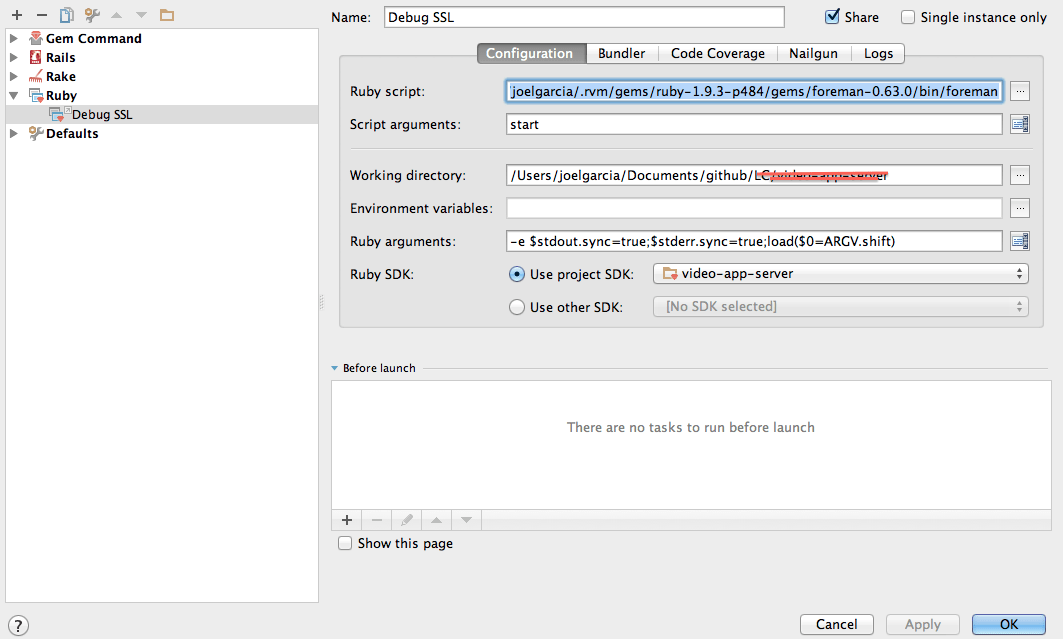
4. Now our configuration is done, but we need to create a Procfile for Foreman to know what to launch when we chose to debug the Debug SSL configuration. Navigate to the root of your Ruby project and create a textfile entitled ‘Procfile’. In the Procfile, you will want to put in the following:
web: bundle exec thin start –debug -p 3000 –ssl –ssl-verify –ssl-key-file /Users/path_to_key/selfsigned.key –ssl-cert-file /Users/path_to_key/selfsigned.crt
Now, what is this? In the Procfile, we’re going to start the Thin web server with the appropriate RVM version. Thin is going to listen on port 3000, and we’re going to run SSL through port 3000 using our SSL keys and cert.
5. Now, in RubyMine, go to RunDebug Debug SSL, and your debugger should launch. In my situation, I’m using a self signed certificate. On my Mac, I’ve only been able to navigate to my http://0.0.0.0:3000 using Firefox d. I’ll write up another article on creating a self signed certificate using OpenSSL later. 

Joel Garcia
Joel Garcia

Joel Garcia has been building AllCode since 2015. He’s an innovative, hands-on executive with a proven record of designing, developing, and operating Software-as-a-Service (SaaS), mobile, and desktop solutions. Joel has expertise in HealthTech, VoIP, and cloud-based solutions. Joel has experience scaling multiple start-ups for successful exits to IMS Health and Golden Gate Capital, as well as working at mature, industry-leading software companies. He’s held executive engineering positions in San Francisco at TidalWave, LittleCast, Self Health Network, LiveVox acquired by Golden Gate Capital, and Med-Vantage acquired by IMS Health.

Related Articles

The Difference Between Amazon RDS and Aurora

The Difference Between Amazon RDS and Aurora

AWS does incorporate several database services that offer high performance and great functionality. However, customers do find the difference between Amazon Relational Database Service and Amazon Aurora. Both services do provide similar functions, but do cover their own use cases.

AWS Snowflake Data Warehouse Pricing Guide

AWS Snowflake Data Warehouse Pricing Guide

AWS Snowflake Data Warehouse – or just Snowflake – is a data cloud built for users to mobilize, centralize, and process large quantities of data. Regardless of how many sources are connected to Snowflake or the user’s preferred type of organized data used, data is easily stored and controllably shared with selectively-authorized access. Snowflake does offer extensive control over its pricing, though how it works isn’t always clear.

Single-Tenant vs. Multi-Tenant Cloud Environments

Single-Tenant vs. Multi-Tenant Cloud Environments

Operating a cloud environment and optimizing Software as a Service can be managed in two different methods. Reasons for adopting either single-tenant or multi-tenant cloud environments are dependent on business and customer-related factors as well as how much more expensive one architectural structure will be over the other. Both structure types also have a number of security and privacy implications tied to their inherent design.

Download our 10-Step Cloud Migration ChecklistYou'll get direct access to our full-length guide on Google Docs. From here, you will be able to make a copy, download the content, and share it with your team.