As Google steadily implements its core website vitals standards, it will establish a benchmark for streamlined web applications. The goal for this project and any others similar in scope is to ensure we continue to meet these benchmarks and maintain a consistent service for our customers.
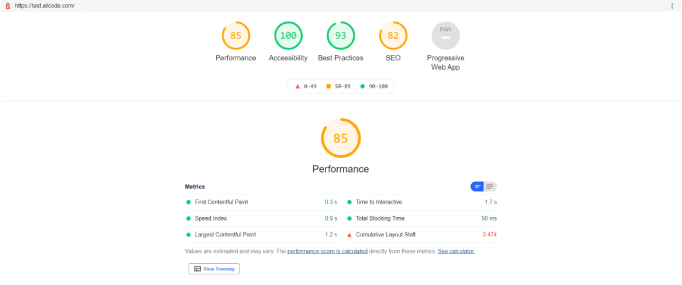
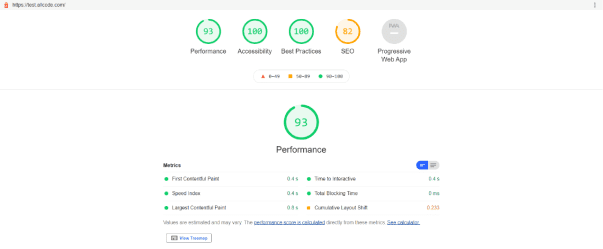
One of the bigger drags on our load time, and Largest Contentful Paint (LCP) is the Drift chatbot and the chunk of JavaScript weighing it down. The LCP is the metric that measures the time it takes for the website to render for the end-user relative to the moment the webpage begins to load.
What we did
The solution we have opted to implement is a facade in place of the Drift toggle button in the lower right corner. We implemented a control using the website’s CSS that acted as a front for the standard Drift button.
How it works
When the button is clicked, the Drift Facade will briefly show a small loading circle as it downloads the needed JS for the bot. After it’s fully downloaded and functional, the facade will be removed from underneath the installed button. This is meant to put off the downloading of unnecessary JS for the website’s performance after the website has rendered when it’s at the user’s volition.
For mobile devices and screens too small to support the Drift bot, the button has been removed through some light CSS. The CSS considers the screen monitor width to determine this function and may need some adjusting from what I determined as a base size. Additional information on average user screen sizes from both tablets, mobile phones, and computers can be found here: https://gs.statcounter.com/screen-resolution-stats/desktop/worldwide
To reiterate, this modification to the Drift bot attempts to reduce the drag on our website from installing extra JS elements. After disabling it on the WordPress backend, we replaced the button with additional CSS elements, including the shift in color upon hovering with the cursor.
Utilizing the block of code used for automatically downloading the bot upon accessing the website, this was changed to an onClick event. Furthermore, the code was simplified by removing the function determining the client’s platform in favor of additional CSS elements removing the button if the screen is too small.
Finally, an asynchronous function was added to remove the CSS button shortly after the bot was installed. Ideally, the changes made will reduce load times for the user end where the Drift bot is applied.
The results
We were stunned by the difference that the Facade made on our website loads speed. Check out the results below:
- AllCode test site before the Drift Facade


2. AllCode test site after the Drift Facade


How to add the Drift Facade Yourself
Adding the Drift Facade is pretty simple if you follow these steps. In this example, we will reference Divi, as Divi is the WordPress theme that we made use of when implementing the Drift Facade. Don’t worry, you don’t need to have Divi installed on your website for this to work, you can have any theme installed.
1. Upload the following JS snippet to the site’s child theme folder.
JS
async function deleteButton() {
	var bgone = document.getElementById("getthis");
	bgone.innerHTML = "<div class='loader'>";
	await drift.load('xxxxxxxxxxxx'); //Insert local Drift key here
	bgone.remove();
}


function buttonToggle(){


 var t = 0;
  var t = window.driftt = window.drift = window.driftt || [];
  if (!t.init) {
    if (t.invoked) return void (window.console && console.error && console.error("Drift snippet included twice."));
    t.invoked = !0, t.methods = [ "identify", "config", "track", "reset", "debug", "show", "ping", "page", "hide", "off", "on" ],
    t.factory = function(e) {
      return function() {
        var n = Array.prototype.slice.call(arguments);
        return n.unshift(e), t.push(n), t;
      };
    }, t.methods.forEach(function(e) {
      t[e] = t.factory(e);
    }), t.load = function(t) {
      var e = 3e5, n = Math.ceil(new Date() / e) * e, o = document.createElement("script");
      o.type = "text/javascript", o.async = !0, o.crossorigin = "anonymous", o.src = "https://js.driftt.com/include/" + n + "/" + t + ".js";
      var i = document.getElementsByTagName("script")[0];
      i.parentNode.insertBefore(o, i);

    });
    };
  }

drift.SNIPPET_VERSION = '0.3.1';

drift.load('xxxxxxxxxxxx'); //Insert local Drift key here

//insert callback here

	deleteButton();

}
2. Make local copies of the CSS and any JS files that are to be altered. Maybe the <head> lines too if they are stored via Divi’s integration.
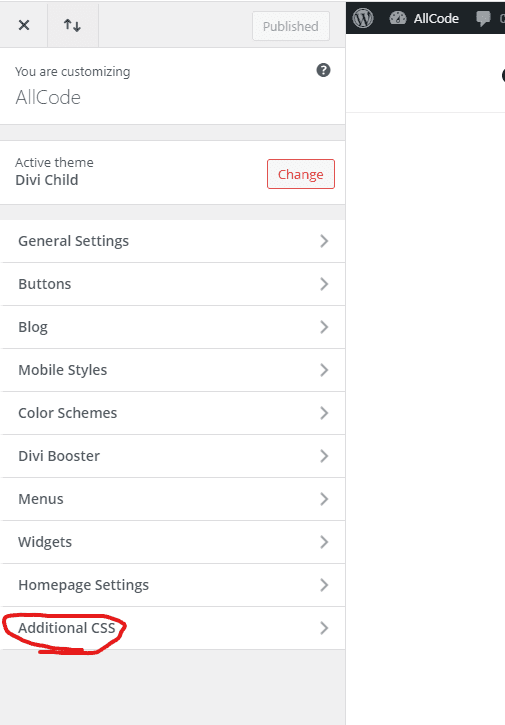
3. Add the following CSS provided to the child theme’s CSS file or retroactively through the ‘Additional CSS’ when editing the theme. Colors might need to be adjusted to match your site’s theme.
CSS
.h3 {
    font-size: 2em;
}

.red-dot:hover{background-color:rgb(150, 25, 22); !important}

.red-dot{
	height: 54px;
	width: 54px;
	background-color: rgb(231, 39, 35);
	border-radius: 50%;
	display: inline-block;
	text-align: center;
	line-height: 5px;
	padding: 15px;
}

.icon-bar {
	position: fixed;
	top: 50%;
	transform: translate(1811px, 393px); /*1811, 393*/
}

.loader {
  border: 4px solid #f3f3f3;
  border-radius: 50%;
  border-top: 4px solid #3498db;
  width: 32px;
  height: 32px;
  text-align: center;
  -webkit-animation: spin 2s linear infinite; /* Safari */
  animation: spin 2s linear infinite;
}

/* Safari */
@-webkit-keyframes spin {
  0% { -webkit-transform: rotate(0deg); }
  100% { -webkit-transform: rotate(360deg); }
}

@keyframes spin {
  0% { transform: rotate(0deg); }
  100% { transform: rotate(360deg); }
}
4. Add the following line to the header:
<script src=”/wp-content/themes/ (theme name here) /facade.js”></script>
Using Divi, it can be inserted under Divi>Theme Options>Integration.

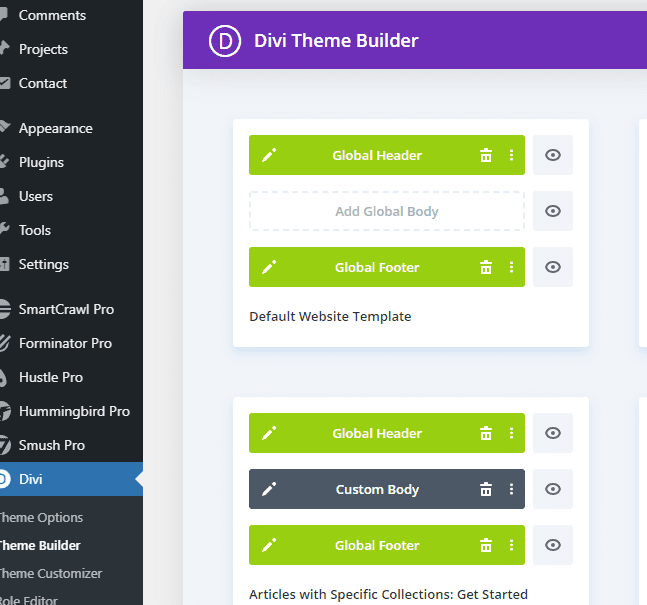
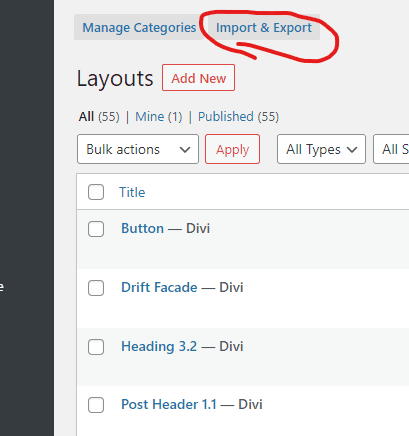
5. Download the JSON file by clicking the button below and insert it into the global footer. This can be done under Divi>Theme Builder. The attached folder can be imported from Divi>Divi Library.
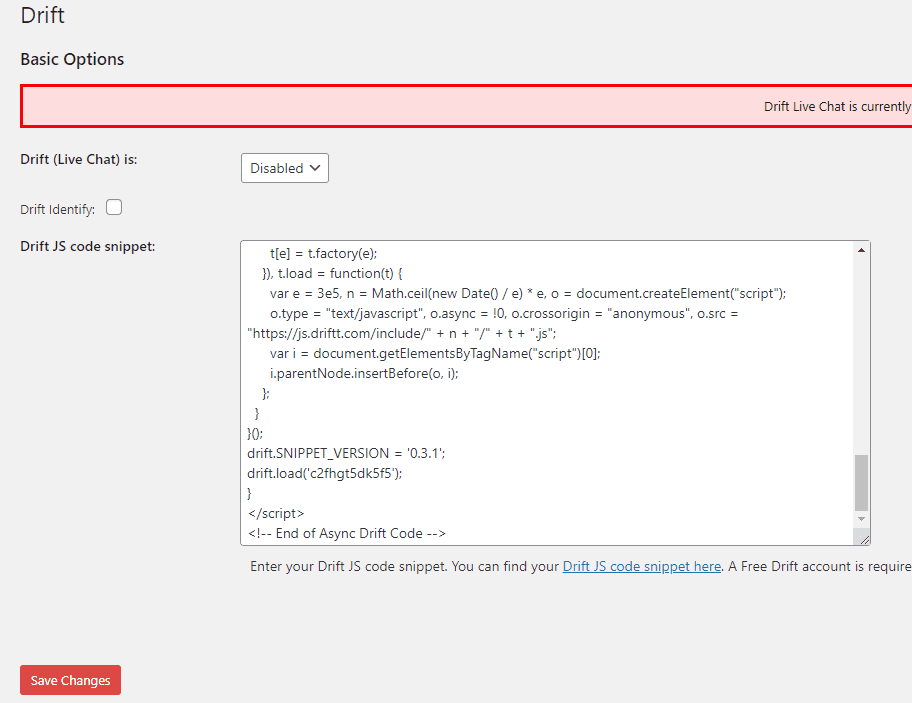
6. Now, disable Drift bot. This can be done from Settings>Drift, click the dropdown, and save.
Rollback Steps
The Drift Facade wasn’t what you expected? Follow these simple steps to remove the content from your site:
1. Remove HTML from the global footer.
2. Reactivate the Drift Bot from settings.
3. Restore JS and CSS files from local saves.


