Introduction to ARKit
In the latest news about iOS, ARKit is receiving a lot of attention, due to its ability to visually impress everyone (not just developers). ARKit is a young technology with flaws, without a doubt. However, the ARKit is a hit and we intend to explore its potential in the following tutorials.
First of all, a few basic concepts:
- AR vs VR
- VR stands for Virtual Reality, it is defined as the ability to stimulate the senses via images, sound and other media to give the user the feeling that he/she is physically inside a virtual or imaginary world.
- AR stands for Augmented Reality, it is defined as an extended view of the real world with elements added by a computer or different sensors like video, gps, etc. Augmented Reality is more focused on improving the perception of the real world than trying to represent a new one.
ARKit allows developers to build augmented reality applications taking advantage of the camera’s features, for example, the cpu, the gpu and the motion sensors of the device. This framework abstracts all the complex process of detecting elements in the real world inside the camera feed and the users relative positioning, allowing the developer to focus directly on improving the user experience.
Note: ARKit is only available for devices with the A9 processor or better, this means you should target an iphone 6s or better and iPad Pro first generation or better. Finally, please have in mind that it will NOT work on the iOS emulator.
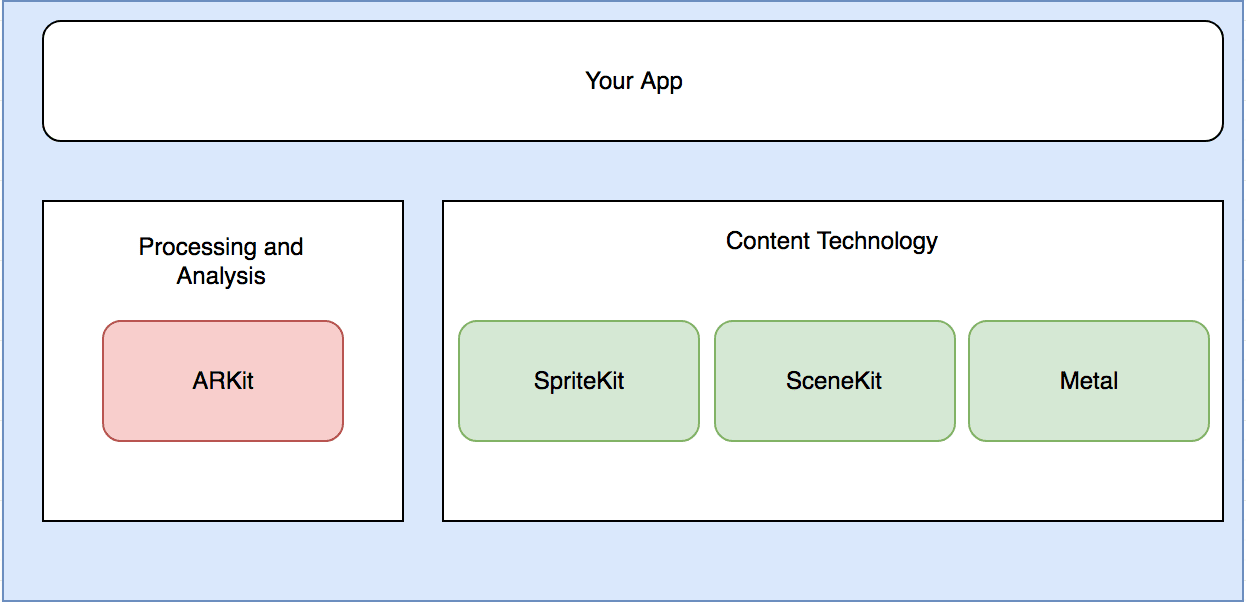
Let’s start with some concepts, one of the main things you have to decide with ARKit is which content technology will you use to render your elements, let’s check our options:
- SpriteKit: is probably the easiest way to start and the elements related to it are friendly for starters. SpriteKit is a 2D rendering engine introduced by iOS 7, it allows video game development and it’s built on top of OpenGL; if we are going to use it within our ARKit app, we should use ARSKView as the 2D content provider.
- SceneKit brings the 3D functionality on top of OpenGL, ready to be used inside our app, this framework is aimed to simplify the developer’s process of incorporating 3D elements into their games/apps without having to deal with the complexity related to OpenGL/Metal; if we are using it within our ARKit app we should use ARSCNView as our 3D content provider.
- Metal is the technology that you want to use if you have plenty of experience developing 3D apps and you don’t have any issue directly manipulating the input elements that ARKit provides like frame details and detailed sensors information.
Moving into more technical details let’s review a diagram that will illustrate what might be the basic structure of an ARKit app:
To start, we will need an instance of ARSession configured by an ARSessionConfiguration, having this setup we will start the session and with magic combination of the camera feed and the sensors we will be receiving an ARFrame object with the elements describing what the user sees and the related locations within the space.
With ARKit we have the possibility of 2 tracking levels, both are defined sub-classes of ARConfiguration:
- AROrientationTrackingConfiguration which basically detects the device rotation/orientation, not it’s positioning. This is also known as 3DOF(3 degrees of freedom)
- ARWorldTrackingConfiguration a more specialized class that has the information for the device’s rotation,positioning, plane detection and hit tests. This is also know as 6DOF(6 degrees of freedom)
We can check if our device actually supports one of the other by using:
    // Can we use WorldTracking?
    if ARWorldTrackingConfiguration.isSupported {
        self.config = ARWorldTrackingConfiguration()
    }else{
        self.config = AROrientationTrackingConfiguration()
    }
Other 2 basic concepts to have in mind are:
- ARFrame is the “current” representation of the scene in a given moment and it has all the info that ARKit had at the moment, tracking, camera feed, sensors,etc.
- ARAnchor are the hooks that allow us to place objects within the augmented representation of the real world, in ARKit we can build them or they can be automatically detected by the framework as a positioning reference.
OK, let’s start with our first app.
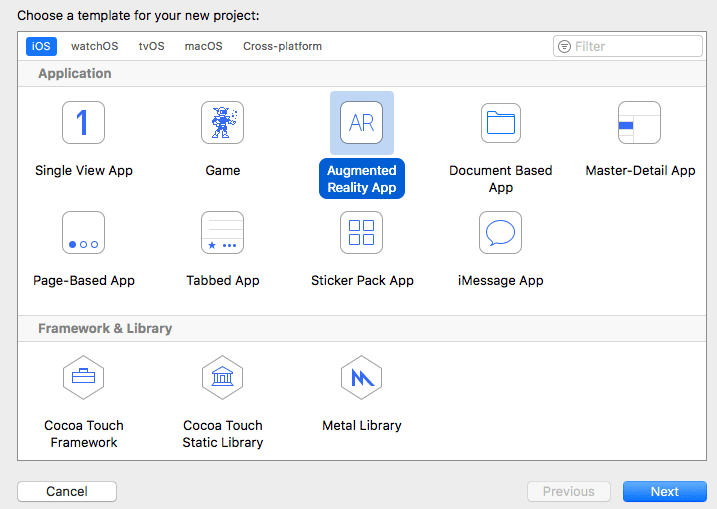
- Let’s begin with creating a new XCode project and select: iOS -> Augmented Reality App
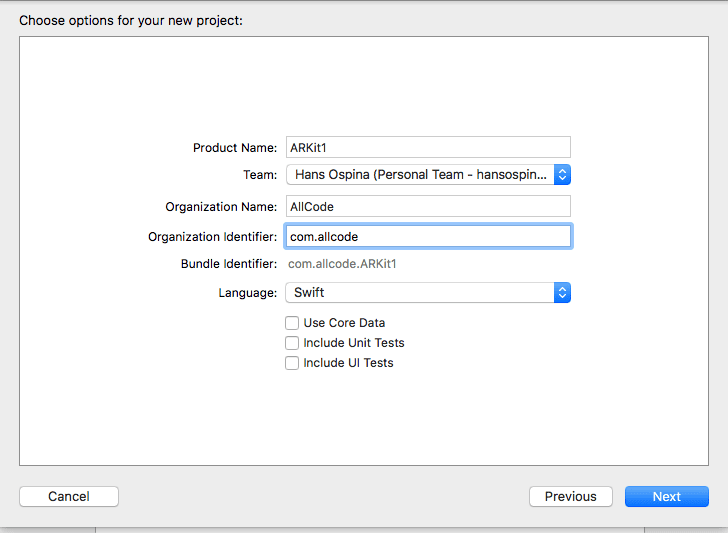
- In the next screen we will place the app name, for now it will just be: ARKit1 and then we select the technology we are going to use: SpriteKit, SceneKit or Metal; for this app we are going to pick SpriteKit.
- We will start with an empty application with the following elements:
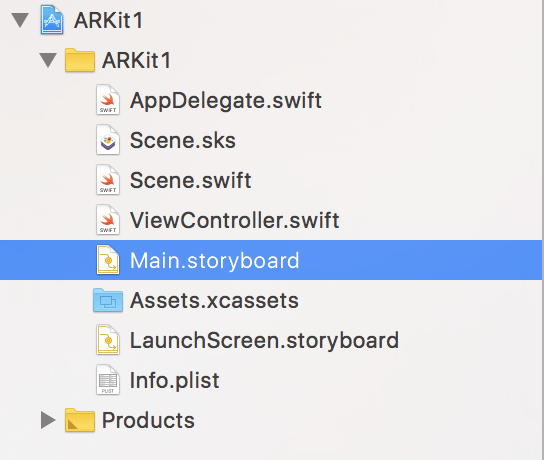
Let’s check them:
AppDelegate.swift,Main.storyboard,ViewController.swiftAre traditional elements of any iOS app, now let’s look at the new elements:Scene.sksis the object that represents the SpriteKit scene that we are going to be rendering.Scene.swiftis aSKScenewhich basically is the root node that SpriteKit uses to start rendering it’s scene; the Scene object defines the behavior of the app we the user interacts with it, in this case, adding anARAnchorwhich will be the marks that will show the places where the user did tap on the screen.
The main logic within our ARScene happens inside this code snippet:
     // Create anchor using the camera's current position
    if let currentFrame = sceneView.session.currentFrame {
        // Create a transform with a translation of 0.2 meters in front of the camera
        var translation = matrix_identity_float4x4
        translation.columns.3.z = -0.2
        let transform = simd_mul(currentFrame.camera.transform, translation)
        // Add a new anchor to the session
        let anchor = ARAnchor(transform: transform)
        sceneView.session.add(anchor: anchor)
    }
We are basically taking the actual frame(ARFrame) where the tap event ocurred with touchesBegan(_ touches: Set<UITouch>, with event: UIEvent?) and the we apply a translation into the transform(spacial point(x,y,z)) of 20 centimeters in the Z axis(Z represents depth level) in the 3D space; finally, we create an ARAnchor with the new location of and we add it to the scene.
Now that we have clear what is happening in the scene, let’s move into the ViewController.swift where we are going spot the following things:
- The controller is implementing
ARSKViewDelegateand you will be able to find the methods related to it at the following mark:// MARK: - ARSKViewDelegate - Inside
viewDidLoadtheARScenerecevies it’s initial setup and then the current controller is designated as the delegate for it, finally, we load theScene.sksfrom SpriteKit into the sceneView component that comes as an outlet from the storyboard. - Inside
viewWillDisappearthe session is always paused like this:sceneView.session.pause(). - Also, inside
viewWillAppearwe see how useARWorldTrackingConfiguration()to configure our session and the it is started. - Finally, in
func view(_ view: ARSKView, nodeFor anchor: ARAnchor) -> SKNode?we are going to find the lst key part to understand from our app:
- Remember we did add the
ARAnchorinto the session insideScene.swift?, well, this anchor will it’s representation into the scene and for that we will return aSKLabelNodewhich allows us to paint text into SpriteKit graphihc node, in our app we are painting an emoji, let’s even change into a another that fits more our mood:- Find the line with:
let labelNode = SKLabelNode(text:and replace the space invader emoji with pumpkin(Halloween time!) just press: Control+Command+Space and the emoji keyboard will appear and we will be able to pick the emoji we like the most.
- Find the line with:
func view(_ view: ARSKView, nodeFor anchor: ARAnchor) -> SKNode? {
    // Create and configure a node for the anchor added to the view's session.
    let labelNode = SKLabelNode(text: "?")
    labelNode.horizontalAlignmentMode = .center
    labelNode.verticalAlignmentMode = .center
    return labelNode;
}
We are ready! just press Command+R and the app will launch into our cellphone(don’t forget that ARKit will not run into the emulator) and every time we want to place a pumpkin we just need to tap on the screen.