Share
What AWS MGN?
AWS MGN helps organizations to move large numbers of physical, virtual, or cloud servers infrastructure without compromising compatibility, performance, or cutover times. AWS MGN is based on CloudEndure Migration and connects to the AWS management console. This provides a secure and flexible integrated solution for public sector customers. AWS MGN allows you to administer it from the AWS Management Console, restrict rights and access with AWS IAM, and monitor it with Amazon CloudWatch and AWS CloudTrail.
Lift-and-shift (also known as “rehost”) is a popular way of transferring workloads from on-premises to AWS. To reduce risk and speed up time to production, we find that most applications are rehosted on the cloud when large-scale legacy migrations are undertaken. Rehosting, for example, saved GE Oil & Gas around 30% of its costs even without implementing any cloud enhancements. Your on-premises (physical or virtual) or amazon cloud computing servers (referred to as “source servers”) can be duplicated into your AWS account using AWS MGN. When you’re ready, AWS MGN converts and deploys your servers on AWS, letting you to immediately benefit from cost savings, greater productivity, resilience, and agility. Once your apps are running on AWS, you may quickly re-platform or rework them using the AWS cloud computing platform’s services and capabilities.
Migrating On-Premises Workload
The WordPress blog used in this tutorial is running in a simulated on-premises data center as a two-tier stack. While Ubuntu 16.04 LTS hosts the frontend Apache server, mySQL also runs on Ubuntu 16.04 LTS to support the database. In a simulated data centre, all systems are virtualized and housed on a single platform.
The following are the main steps in the migration procedure:
- Create an AWS Replication Agent IAM user.
- You can do this in the AWS MGN Console by creating a Replication Settings template.
- Replication Agents can be installed on the source servers.
- The AWS MGN console can be used to configure the Launch Settings.
- Activate the sandboxes for testing
- Start the switchover instances.
- Cutover is complete.
Prerequisites
- Have an Amazon Web Services account
- Have a firm grasp of Amazon Virtual Private Cloud (Amazon VPC)
- Create a virtual networking environment for the sake of this walkthrough:
- MGN-Demo VPC is an Amazon VPC that you can create.
- Staging Area Subnet, Migrated Resources Public Subnet, and Migrated Resource Private Subnet are the three subnets created in the MGN-Demo VPC.
- Create an Internet gateway and connect it to the MGN-Demo Virtual Private Cloud.
- Public-MGN-Demo-RouteTable and Private-MGN-Demo-RouteTable are two route tables to create.
- Add an internet route to the Public-MGN-Demo-RouteTable (target 0.0.0.0/0, destination 0.0.0.0/0).
- Assign the Public-MGN-Demo-RouteTable to the Staging Area Subnet and Migrated Resources Public Subnet.
- Associate the Private-MGN-Demo-RouteTable with the Migrated resource private subnet.
- Bastion hosts should build an Amazon Elastic Compute Cloud (Amazon EC2) instance in the Migrated Resources Public Subnet in order to serve the migrated resources.
- The security groups Public-MGN-Demo-SG and Private-MGN-Demo-SG must be created in order to function properly.
- Make sure to include inbound rules for HTTP and HTTPS ports from everywhere (0.0.0.0/0), as well as the SSH port for the Bastion host’s public IP address, in the Public-MGN-Demo-SG configuration.
- On the Bastion host, inbound rules for MYSQL ports from the Public-MGN-Demo-SG security group, as well as SSH ports from the Bastion host’s private IP address, should be added to the Private-MGN-Demo-SG security group.
AWS MGN migration architectural diagram.


Download list of all AWS Services PDF
Download our free PDF list of all AWS services. In this list, you will get all of the AWS services in a PDF file that contains descriptions and links on how to get started.
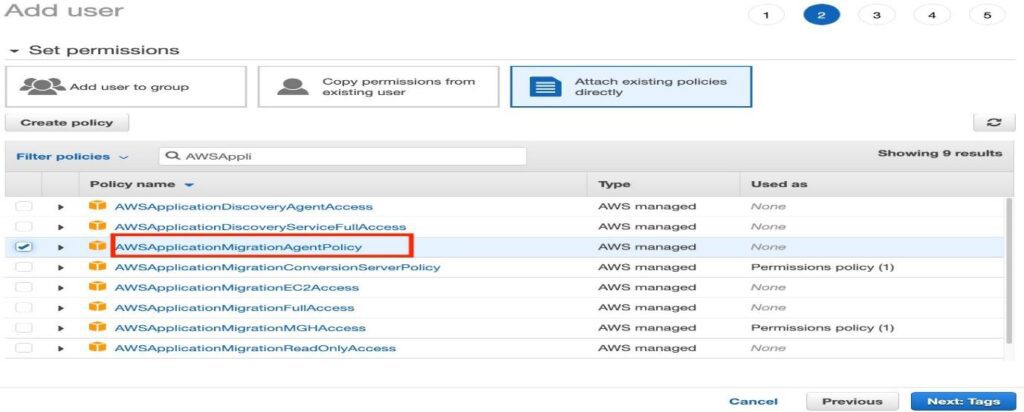
Create an AWS Replication Agent IAM user in order to access the service
To utilize AWS MGN, you’ll need to sign in with your Amazon Web Services account credentials. Assign the appropriate permission policy to an AWS Identity and Access Management (IAM) user that has been created. Make a note of your Access Key ID and Secret Access Key, which you will need to input during the installation of the AWS replication agent on the source servers.

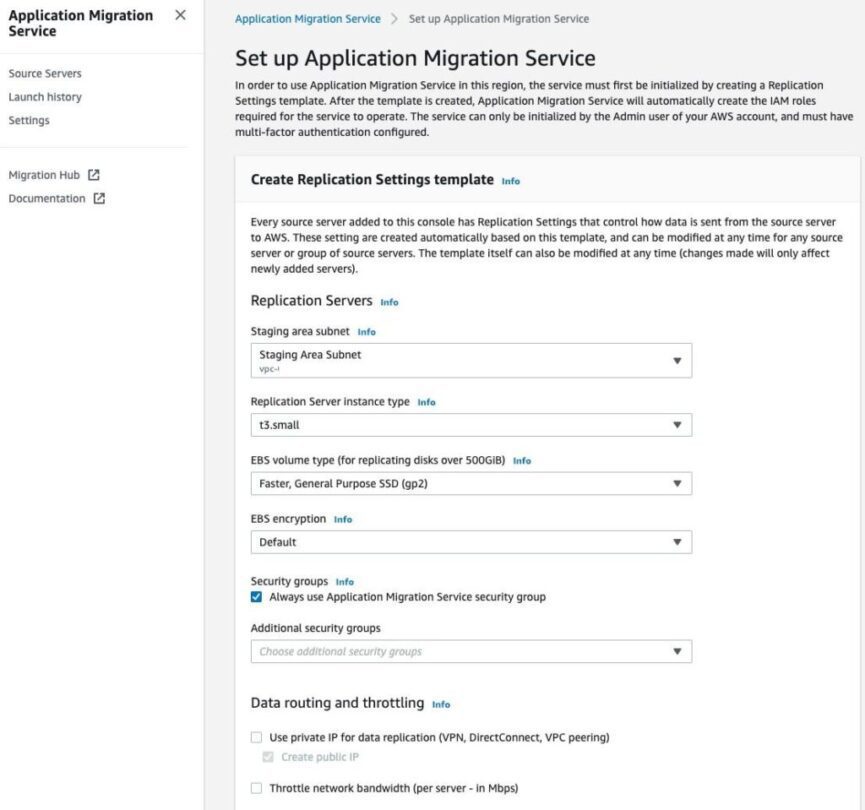
Create a template for the replication settings:
In order to migrate your servers from on-premises or another cloud service provider, you must first define your replication settings in the AWS MGN console before the service can be initialized for the first time. Through the AWS console, you can have access to AWS MGN.

Need help on AWS?
AWS Partners, such as AllCode, are trusted and recommended by Amazon Web Services to help you deliver with confidence. AllCode employs the same mission-critical best practices and services that power Amazon’s monstrous ecommerce platform.
Install the AWS replication agent on the source servers on-premises after AWS MGN has been activated with the creation of the replication settings template and you have generated the relevant AWS credentials with the necessary permissions. There are two sets of installation instructions, one for Linux and one for Windows:
The installer asks for your AWS Region Name, your AWS Access Key ID, and your AWS Secret Access Key. Use the Access Key and the Secret Access Key that you already stored.
Once you’ve entered the credentials, the installer finds the volumes for replication and prompts you to select the discs to replicate, press enter.
Install the AWS replication agent on all source servers using the same procedure as described before.
Return to the AWS MGN console after installing the AWS replication agent on the source servers to verify that the source servers are still operational in the console. Please keep in mind that by installing the AWS replication agent on the source servers, the source servers are automatically added to the AWS MGN console.

After the initial sync has been completed, the migration lifecycle displays Ready for testing and the data replication status displays Healthy, indicating that the migration is complete.
Specify how you want the program to launch
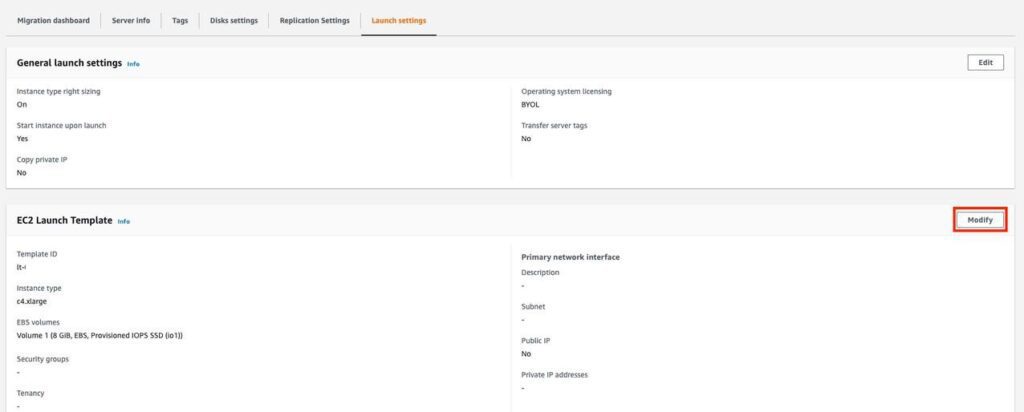
Configure the launch settings prior to testing or switching over an instance. The launch settings are a set of instructions that control how a test or cutover instance is launched for each source server in the AWS cloud computing infrastructure.
General launch settings and Amazon EC2 launch templates are the two components that make up the launch configurations section.
Then, for each server, go to the Launch Settings tab and make any changes to the launch parameters

For the purposes of this walkthrough, we will leave the general launch parameters at their default values. Aside from that, we will be making changes to the Amazon EC2 launch template in order to deploy the Application Server and Database Server in the appropriate subnets, which you have already setup with the appropriate security groups. Scroll all the way down to Network Interfaces. Subnet: Select the appropriate subnet for the app server, such as Migrated Resources Public Subnet for the app server, and Security groups: Select the Public-MGN-Demo-SG for Security groups, and enable Auto-assign public IP for the public-facing app server under Auto-assign public IP. After that, pick Create template version from the drop-down menu.

This opens a new window that displays a message indicating that you have successfully adjusted the EC2 Launch Template. The next step would be to modify the default version that the EC2 launch template would use. To do so, select View Launch Template from the menu bar.
In the Launch template box that appears, pick the launch template ID and then select Actions in the top right corner of the window, followed by the option to set the default version of the template

The Set default version dialogue box appears; choose the Template version that you just made and set it as the default version in the dialogue box that appears. The Set default version dialogue box appears; choose the Template version that you just made and set it as the default version in the dialogue box that appears.
For the DB Server (source server), the following changes were made to the Amazon EC2 launch template.
The launch settings for the DB Server are configured by repeating steps 1-9.
To begin, go back to the MGN terminal and select “Source Server for DB Server.”
The Launch Settings tab can be found by selecting it in step 2.
Then, under the EC2 Launch Template, select Modify. 4.
4. Fill out the Template Version description with a description.
Select Network Interfaces from the drop-down menu:
a. Under Subnet, select the appropriate subnet, such as Migrated resource private subnet for the DB Server, from the drop-down menu.
b. The Private-MGN-Demo-SG for Security Groups (also known as the Private-MGN-Demo-SG).
c. Deactivate the auto-assign public IP feature for the DB Server if it is located in a private network.
d. When you’re finished, choose Create template version.
On the Amazon EC2 Launch Template page that has been successfully edited, select View Launch Template.
The Launch template window will appear; in this window, pick DB Server Launch Template ID; in the top right corner, click on Actions; and then click on the Set default version button.
When you click OK, the Set default version window displays. 9. Choose the Template version that you just made and set it as the default version of the template.
Return to the AWS MGN console and log out of the account. DB Server’s source server should be selected, and the modified EC2 Launch Settings should be found under launch settings.
Make test instances
After configuring the launch options for each source server, you may launch them as test instances. It is best to test before switching.
Verify that your source servers are ready for testing by looking at the signs in Figure 14. The source servers are good to go.
On each server, check the boxes to the left of it.
Launch test instances by selecting Test and Cutover in the upper right.

Launch test instances in the dialogue box. This returns you to the MGN console’s source server page. Then select View job details in the top right corner to view the MGN job log details. Track the job’s progress from start to finish. Details can be found in the work logs. Return to the Source Server page of the MGN console. There is now a Launched status for the Alerts.
Adding the new DB Server host to the WordPress App Server configuration:
To see the Migration Dashboard, go to the MGN console and choose the test DB source server.
To see the Amazon EC2 page, click View in Amazon EC2 from the Lifecycle section.
Make a note of the DB Server’s private IP address; you’ll need it to update the WordPress app server settings.
To view the Migration Dashboard, go back to the MGN console and choose the source server for the test app.
To see the Amazon EC2 page, click View in Amazon EC2 from the Lifecycle section.
Take a look at the IP address that is publicly accessible.

Using the public IP address of the test app server, open the app in a web browser and begin using it. When an application has been successfully launched in a web browser, you may select Mark as “Ready for Cutover” to indicate that the application is ready for use. Cutover.
Cutover instances should be launched.
After you have finished testing all of the source servers, you will be ready to begin the cutover process. Before starting cutover instances, verify that the source servers are indicated as Ready for cutover under the Migration lifecycle and as Healthy under the Data replication status before initiating the cutover instances.
Check all of the source servers that will be covered once the confirmation has been received, and then select Launch Cutover instances from the Test and Cutover dropdown option. It appears that the Launch cutover instances dialogue box has been opened. Select Launch to begin the cutover process.
When logged into the MGN console, the source servers are listed as “Cutover in progress.” Select View Job Details in the top right corner of the page to see more information about the position.
To make configuration adjustments to the WordPress App Server using the new DB Server host, repeat steps 1-3. To update grant privileges in the mySQL database, repeat steps 1-3. It is now possible to make DNS changes in order to point to the new application server after finishing the updates to both the application and database servers and confirming connectivity by launching the application through a web browser. Once all other performance tests have been completed, you can make changes to the DNS records to point to the new application server.

Text AWS to (415) 890-6431
Text us and join the 700+ developers that have chosen to opt-in to receive the latest AWS insights directly to their phone. Don’t worry, we’ll only text you 1-2 times a month and won’t send you any promotional campaigns - just great content!
Make final preparations for the transition
The cutover can now be completed successfully, and the cutover can now be closed out. The status of the source servers’ Migration Lifecycle status is changed to “Cutover Complete” after this. Additionally, this ends the Replication Server, and all data replication is stopped and discarded as a result of this action.
Select the checkboxes next to the source servers that you wish to finalize cutover on in the MGN console. From the pull-down menu under Test and Cutover, choose Finalize cutover from the drop-down list. When the Finalize cutover dialogue box displays, select Finalize from the drop-down menu. When this occurs, the status of the source servers’ Migration Lifecycle is changed to “Cutover Complete.”
Summary
By utilizing the AWS Application Migration Service, you have successfully migrated a content management system platform from on-premises (Simulated Cloud environment) to AWS (MGN). Adding auto-scaling and load balancing to the application layer to provide high availability; offloading media content to Amazon Simple Storage Service (Amazon S3); improving the end-user experience with a content delivery network, Amazon CloudFront; securing your website with AWS Certificate Manager; and re-platforming the Amazon EC2 based mySQL Database to Amazon Relational Database Service are all possible in the AWS Cloud environment (Amazon RDS).


